Unlike many other "Home Automation" software offerings, PowerHome is unique in the breadth and richness of the control that can be achieved by program means. The level of automation you achieve is virtually limitied only by your imagination and willingness to design and create "macros" to perform your task.
A "macro," which is just a sequence of steps to be processed to achieve a goal, is just another name for a "program."
While encountering PowerHome Macros for the first time may seen daunting, they are actually easier to use than most programming languages. If you are familar with Visual Basic, Java, C, etc then you will have little problem in creating PowerHome macros, as the same concepts of arithmetic/logic/branching/testing are used.
Macros are constructed in the PH Explorer > Macros window.
PH Explorer is launched via the "Magnifying Glass" icon (red circled) in the Tool Bar or via Menue>Maintenance>PowerHome Explorer.
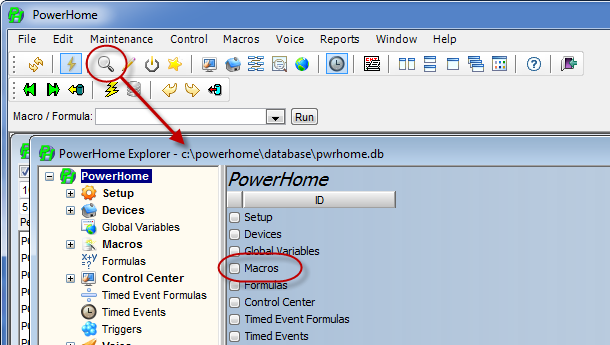
When you click on the radio button to the left of the "Macros" item (red oval circled group), it will open up a window showing a table of your entire macro collection.
Whether that collection is empty or full, you add a new macro by right-clicking on a macro table button, or line and selecting "Insert"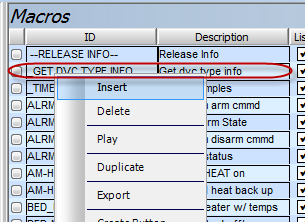
This will create a new line where you can name and describe the macro function.
Let's create a macro that will turn off the lights in the room and turn on your bed electric blanket if it is winter. We will call the macro "ROOM OFF"

This macro will be called by a Trigger event that senses when you do a double-tap of the Off room ceiling light. (This, and Timed Events, is a common method of causing macros to run when appropriate)
Our macro will look like this. An explaination follows ...

Seq #10/20 send Insteon commands to the sofa and chandlier to turn Off.
Seq #30 is a Jump that tests for the month on this date and either executes the next line to turn on the electric blanket (if the month is 11,12,1,2,3) or go down two lines and exit.
In place of the Jump at Seq #30, a "GoTo Label" could have been used instead. The Jump is an easy approach, but if the jump is more than a few lines, it is easy to have subsequent code problems if you change the jumped over code and forget to change the Jump values. The "GoTo Label" allows you to define Labels in your macro and jump to them by name. NOTE: that if a GoTo "Label" is undefined, then the goto just goes to the next line of code. This is actually a handly shortcut, as it allows you to make a Branch command construction like ...
"if({HOME},"nextLINE","AWAY")"
This will just go to the next line of code (assuming there is no "nextLINE" label defined (or any string you choose to use here)) if you are HOME , and branch to the label "AWAY" otherwise.
The Trigger to sense this event would look like this ...

The ID field is just a friendly name for you to remember what this is for. While the Trigger can create many possible actions from direct Insteon Device control to formulas to calling macros, the Macro action is one of the most common Action Types as it offers extreme flexibility. The Action field, for Action Type "Macro", is the name of the macro. Double tapping the Living Room Ceiling light switch will cause an Insteon Group Out command to be sent advising everything that a Fast Off has just been done. This "out" transmission from the switch is an "in" message to PowerHome, and thus we use the "Insteon Group in" Trigger Type. See also "FAQs-Triggering from Device Changes"
NOTE: The Boolean field in the Triggers table defaults to "1" but you can instead create formulas to return a "0" or "1" into the Boolean field. For instance, an "IF" statement here can filter trigger actions. That is, we could only trigger the ROOM OFF action, if it was later than 8:00 PM in the evening by putting the following in the Boolean field.
![]()
This will "filter" the trigger so that if, and only if, the time is between 8:00PM and midnight, that it will "fire."