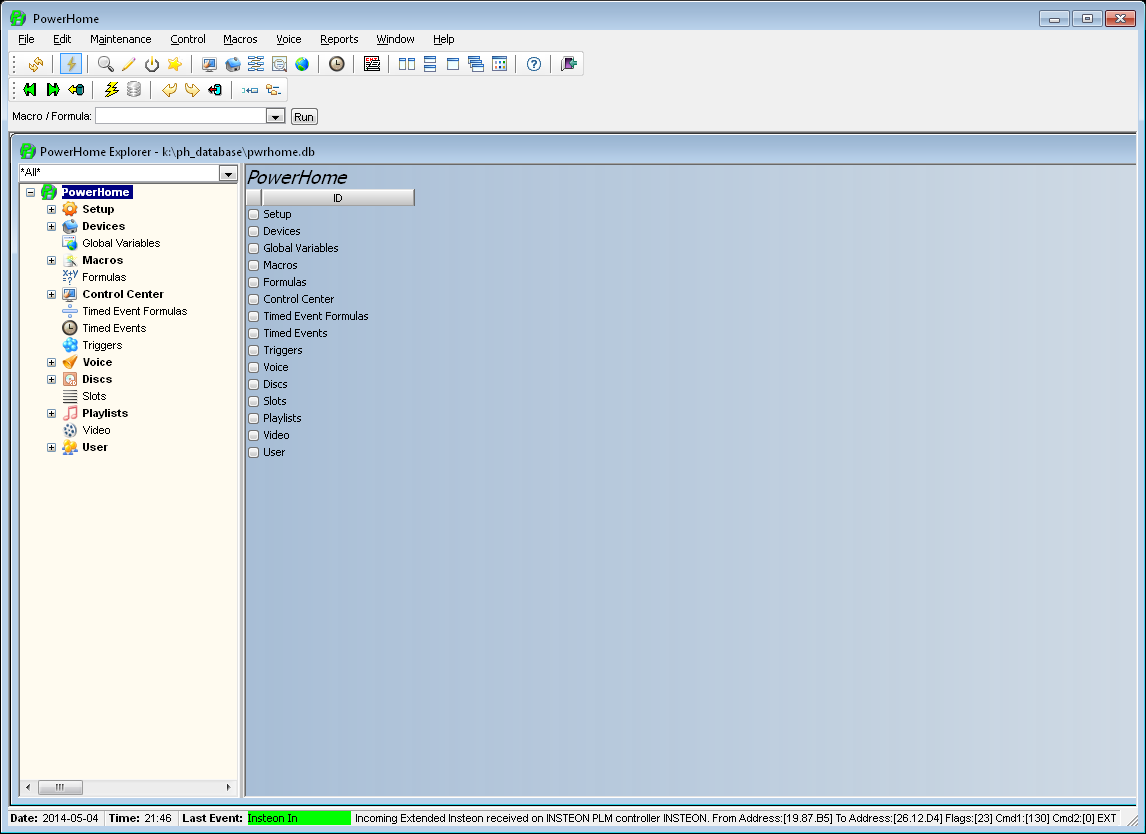
PowerHome Explorer
The PowerHome Explorer is where most
maintenance to the PowerHome system is performed. This single window
allows you to jump section to section with ease and provides a standard
interface similar to the Windows Explorer. The PowerHome Explorer can be
launched from the toolbar or from the menu under Maintenance / PowerHome
Explorer. The Explorer consists of two panes, a left pane which is a
hierarchical treeview control that allows for easy navigation to all the
PowerHome elements and a right pane where actual changes and maintenance is
performed.
You can set the color scheme for the Explorer in the Explorers Setup ->
Preferences section. The left hand pane supports single
left-clicking and single right-clicking. By left-clicking on the
text of a section, that section's maintenance screen will appear in the
right hand pane and any children under the section will be expanded and
visible. By left-clicking on a plus to the left of the section text,
the section will be expanded showing its children without changing the
maintenance screen in the right pane. Right-clicking anywhere within
the left pane will minimize the left pane or restore it to its default
size if already minimized. The Explorer also has a toolbar
associated with its functions. Hovering the mouse over any of the
toolbar buttons will reveal the tool tip associated with the button as
well as the hotkey to directly fire the action. The far left button
is the 'Back' button and can be activated by pressing the 'F2' key.
The Explorer window maintains a history of each maintenance screen
referenced. As you change from screen to screen, this history is
built up. Pressing the 'Back' button will step you back through the
Explorer's history to the previous screens. The next button is the
'Forward' button and can be activated by pressing the 'F3' key. You
can only move forward after you have built some history and moved back
with the 'Back' button. Toggling between the 'Back' and 'Forward'
buttons will allow you to quickly move between maintenance screens.
The next button is the 'Up' button and can also be referenced by pressing
the 'F4' key. The 'Up' button may appear similar to the 'Back'
button but instead of stepping through history, it will move you from a
child to its parent. The next button is the 'Refresh' button and can
also be referenced by pressing the 'F5' key. This key will save any
changes to the maintenance screen immediately, refresh the left hand pane
with any updated information, and re-retrieve all rows within the right
hand pane. The button to the right of the ‘Refresh’ button is the
‘Database button and can be referenced by pressing the ‘F7’ key.
This button will allow you to open a different database other than the
currently connected one such as the sample database. The next couple
of buttons are the ‘Undo’ and ‘Redo’ buttons. If you have made
changes to the right-hand pane of the Explorer and have not yet saved
those changes to the database, you can undo individual changes by pressing
the ‘Undo’ button or the ‘Ctrl-Z’ key combination. If you undo more
changes than you like, you can redo them by pressing the ‘Redo’ button or
the ‘Ctrl-Y’ key combination. Keep in mind that once changes are
saved to the database, they cannot be changed using the ‘Undo’ and ‘Redo’
buttons. The last toolbar button is the ‘Undo All’ button and can be
also be accessed with the ‘F10’ key. This button will undo ALL the
changes made since the last database save and cannot be recovered using
the ‘Redo’ button.
As you navigate from screen to screen, any changes you make are
automatically saved. If you exit the Explorer, or PowerHome, any
changes will also be saved. Pressing the ‘Refresh’ toolbar button or
the ‘F5’ key will also save any changes you’ve made.
The right hand pane supports single left-clicking, double left-clicking
for certain screens/columns, and single right-clicking. This is
where edits to the database are actually performed. Some windows in
the right hand pane do not support changes and can only be used for
navigation. These windows will typically be all gray.
Left-clicking in the right hand pane will allow you to change rows and
fields if you click within an editable field. Right-clicking will
bring up a context sensitive pop-up menu with actions that can be
performed. For example, if you were in the Macro Header maintenance
screen and right-clicked the third row down, a pop-up menu would appear
giving you the option to 'Insert', 'Delete', 'Play', 'Duplicate',
‘Export’, ‘Create Button’, ‘Cut’, ‘Copy’, or ‘Paste’. By clicking
'Insert' you will insert a new blank third row and the original third row
will now be the fourth row. If you had clicked 'Delete', the third
row would have been deleted. By clicking 'Play', you could play that
macro. Clicking 'Duplicate' would have created a new row at the
bottom of all the rows with a copy of the third row macro including all of
its children rows (the macro detail). You could then click the ID
column of this newly created row and type over the highlighted text,
renaming the macro to whatever you wanted. Clicking ‘Export’ will
allow you to export the macro header record along with its detail children
to a file in SQL format. This file could then be modified and/or
emailed to another user and imported into the database using the PowerHome
Multi-Editor in SQL mode.
To add rows into the maintenance screen, you would typically right-click
and choose 'Insert' from the pop-up menu. When editing a completely
blank maintenance screen, the first row is automatically created for
you. When you ‘Insert’ a row, where you click determines where the
row will be inserted. If you right-click on the fifth row, then the
row will be inserted as the fifth row moving the original fifth row and
all others below it down one. If you right-click below all rows,
then the new row will be the last row. But there is an easier way to
add rows if you are entering one row after another. As you fill out
a row and navigate between fields using the 'tab' key, when you fill out
the last field and then tab, a new row is created automatically for
you. This only happens when the row you are on is the last row (or
the only row) and you press the 'tab' key when you are in the last
field. This allows for rapid data entry especially when writing
macro details.
Another feature of the PowerHome Explorer window are the resizeable
panes. If you hover your mouse in the gray area between the left and
right panes, you will see that your cursor will change from an arrow to a
double left and right arrow. When the cursor looks like this, you
can left click and drag the left pane larger or smaller. When you
release the mouse the left pane will adjust to the size you selected and
the right pane will fill any gaps. Both panes include horizontal and
vertical scroll bars when necessary. The right hand pane also
includes a split-scroll window. At the botton of the right hand
pane, just to the left of the horizontal scrollbar's left arrow button is
a black area. When the mouse is hovered over this area, the cursor
will change to a double left and right arrow with two vertical lines
between them. You can click and drag this to the right and you will
be effectively splitting the right hand pane into two pieces, each with
its own independent horizontal scrollbar. This is useful when
working on long maintenance rows where you might be scrolled far to the
right and can no longer see the ID of the rows you are working on.