The Razberry controller gives PowerHome the ability to query and control Z-Wave devices. The Razberry is a Z-Wave enabled daughtercard for the Raspberry Pi. It can be purchased on Amazon at this link: https://www.amazon.com/Z-Wave-Me-RaZberry2-Plug-Raspberry-frequency/dp/B01M3Q764U. Details of the Razberry can be found here at the manufacturers website: https://z-wave.me/products/razberry/. In order to use this controller with PowerHome you must first have a Raspberry Pi paired with a Razberry daughtercard and the Z-Way software properly installed configured. Details on this can be found on the manufacturers website. PowerHome uses the "Expert" mode interface of the internal Z-Way webserver running on the Raspberry Pi to perform its control.
Once you have your hardware running properly, you can create a "Z-Wave Razberry" controller in the Setup section of PowerHome Explorer. The "Settings" window for this controller will look similar to this:
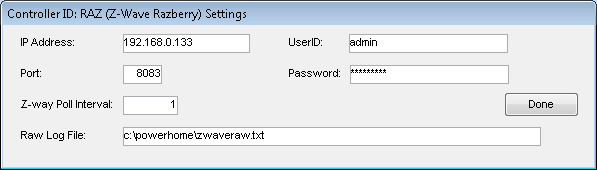
Set the IP Address to the IP of your Raspberry Pi hosting the Z-Way webserver. The default port is 8083 so unless you've changed, the default value on this screen should be fine. The UserID and Password fields hold the UserID and Password you previously configured in the Z-Way web interface when you initially setup your hardware. The Z-way Poll Interval is how often in seconds that you wish to poll the Z-Way server for any Z-Wave changes. The Raw Log File should be set to a path and filename where you would like to have log information written if you enable it within the Z-Wave Explorer.
Configuration of Z-Wave devices within PowerHome is done using a dedicated Z-Wave screen called the Z-Wave Explorer. You can do basic Z-Wave setup such as Inclusion and Exclusion in this screen or the Z-Way web interface. Once you have included Z-Wave devices in your Razberry home network, they will appear on the "Nodes" tab of the Z-Wave Explorer. This tab is primarily informational data but you can configure some of the columns such as the "Given Name" and the "Switch All Mode". You can also click on the "Options" button for a node and perform some control actions associated with it as well as configure parameters specific to the node. Any changes made on this tab will be directly reflected within the Z-Way expert interface and vice versa so you can use whichever interface you prefer.
To define actual Z-Wave devices in PowerHome, you'll use the "Devices" tab. While "nodes" represent the physical Z-Wave devices that have been "included" on your network, "Devices" represent the logical functions available within a node and are tied to a specific Command Class that the node supports. Z-Wave "Devices" defined within PowerHome are NOT reflected in the Z-Way interface and are PowerHomes representations of the functions available for Nodes. You'll enter an ID and Description and the Node number that the device is a function of. Once you've entered the "Node ID", the "Command Class" column will present CC's that are available for that Node. This screen is similar to the Analog IO screen where you have the option to supply RawtoCalc and CalctoRaw formulas for manipulating the raw and calculated values or performing other actions such as updating the foreground and background colors for the device displayed in the Device Status screen. You can also enter a "Poll Interval" (in seconds) for how often you would like the Razberry controller to query the Z-Wave device.
The Z-Way Tree tab is very useful for seeing the entire raw Z-Way data structure that is maintained within the Raspberry Pi Z-Way interface. This data is normally returned in JSON format but is flattened for display on this screen. This screen is useful to see all options available within your "included" nodes.
With the Razberry Z-Wave controller, you have a number of Z-Wave related functions available for control and query of Z-Wave devices. You also have 3 triggers available: Z-Wave Device Chg, Z-Wave Get, and Z-Wave Set.