GadgetGuy
Super User


Joined: June 01 2008
Location: United States
Online Status: Offline
Posts: 942
|
| Posted: May 30 2009 at 15:42 | IP Logged
|

|
|
A number of people have inquired about setting up Control Panel functionality so they could access PH devices from other computers or PDA's over the web or LAN.
Here is a simple tutorial intended to get one started.
Creating Thermostat Control via the PH Control Center
In order to have a context for the Thermostat (STAT) control, this document will start by creating a CC object using the PH Wizard and a few simple light control switches. This will create a default CC Panel with some content in the CC database that you can then manually edit STAT objects into.
The simple example Insteon lighting environment used here consists of the following devices, located on three different levels of the house. Note it includes a Thermostat Insteon Adapter.
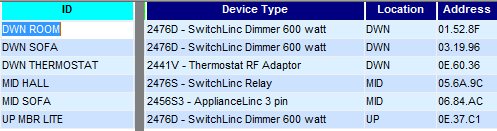
Because the Control Center will group devices by their Location, be sure to enter the Location data column in the Insteon Explorer Devices tab table. Note, this table is very wide so you will have to scroll right to see all the columns.
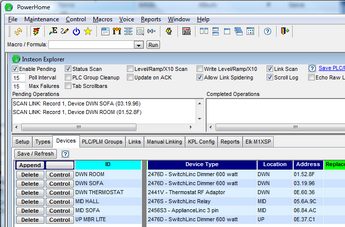
To simply create a Control Center Panel, run the PH Wizard via the PH Menu Bar selection of Maintenance>Wizard. In the Wizard window that opens, select the “Control Center (Auto generate Control Center screens for your lighting devices)” item and click on “Next” at the bottom of the window. In the next window select the screen size you desire for your CC Panel. Unless you have a large number of buttons, the Default 640 x 480 panel should be adequate. You can always change it later in the CC database table. Click “Next” and that’s all you have to do. You have just created a CC Panel that you can access via the PH Menu bar at Control>Control Center or by clicking on the PH Tool bar Control Center icon [ ]. ].
The CC Panel we've just created looks like this…
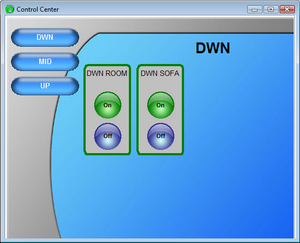
Note that the Wizard has created the CC Panel with multiple Tabs for the different (DWN, MID, UP) locations in the house. Also note that while there were three DWN devices (the ROOM, SOFA, and STAT) the STAT is NOT a lighting device and so the Wizard ignores it in creating the control panel.
Not to worry though. We will be sticking a STAT into this panel, in a moment.
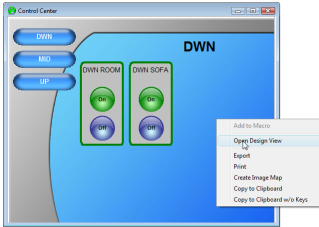
Now RIGHT-click on the CC Panel and select “Open Design View”
We are now going to create a Button that will call a STAT Macro to set the temperature to 70 degrees. This button will call the Macro named TSTAT-HEAT70 already documented in the “Comprehensive Insteon Thermostat Macros” in this Repository Forum.
In the Design View window that opened, enter an ID string for the label in the lower ID field.
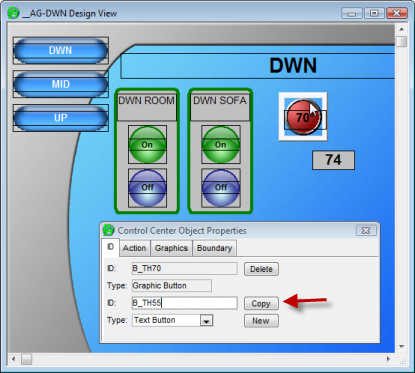
In order to make sense of all the object ID’s later in the database table, I use a practice of preceding the object ID with an “L” for labels, “B’ for buttons, etc. Following this practice, name the button (ID) as “B_TH70” (for example, Button.Temperature.Heat.70) Select the Type as “Graphic Button.” (NOTE: See the end of this post for definitions of the Type field choices.)
To finish this operation, click on the “New” button in the Window (red arrow).
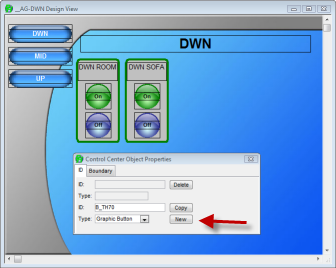
When you do, your new object will appear in the CC Panel BUT IT IS EASY TO MISS as it appears in the upper left hand corner of the panel. The first time I tried all this, I thought nothing was getting created!
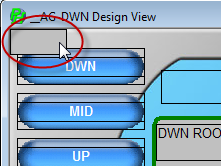
Drag the button down into a position in the CC Panel where you will want it. Don’t worry about exact positioning, we can tune it up later. (Shortly, I will also publish a follow-on Tutorial that shows how this Wizard puts things into the CC database table, and how to edit/add that table.)
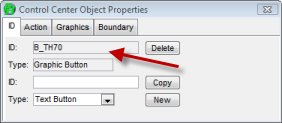
Note the CC Object Properties window reflects the ID and Type of the Object that is selected.
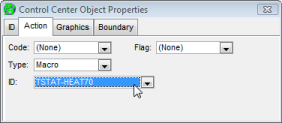
Click on the “Action” Tab of the Properties window and select a Type of “Macro” and select the Macro to be activated (this Macro must have been defined already in the Macro section of the PowerHome Explorer. In this case, we choose the TSTAT-HEAT70 macro.
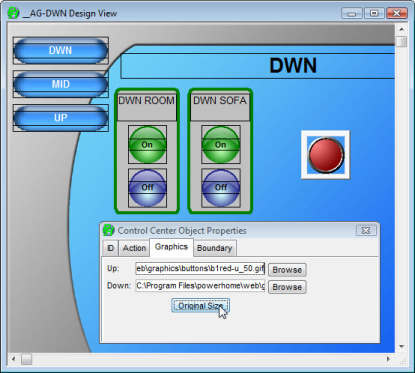
Now we must choose a Graphic for the button. There are two graphics associated with a button, an UP and a DOWN graphic. The normal state is UP but when you mouse click on a button, the DOWN graphic momentarily appears as if you pushed the button down.
PH comes with a large assortment of graphics already defined. They are located (assuming you did a default installation of PH) in “C:\Program Files\powerhome\web\graphics\buttons.”
Click on the “Graphics” Tab of the Properties window and Browse to a button image. Here I chose red 50 pixel diameter Up and Down buttons. Also be sure to click on the “Original Size” option in the window to correctly size the button image. You can scale the button image to other sizes by dragging the object boundary. You can now also position the button where you’d like it by clicking in the middle of the Object and dragging it.
Also NOTE that when the Object Window opened in PH, that PH modified its Toolbar to include Control Center Design Controls [Red arrow] that you can use to modify your objects.

To manipulate multiple objects (eg, to align them)use CONTROL-CLICK to select multiple items.
Now we’ll add a label to the STAT control button so we know what it is.
Create another “New” object via the Properties window. Name it “L_TH7” to designate that it is a temp.heat.70 object. Select a Type of “Static Text.”

Drag the new object from the upper left corner of the Design View window (if you haven’t already) and drop it over the red heat control button. You can use the up/dwn left/right arrows on your keyboard to more precisely position the label over the button.
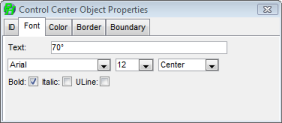
Click on the “Font” Tab and enter text for your new label. Since this button will set the STAT to HEAT-70 degrees, and the control button is already colored red to signify “heat,” let’s label it simply “70°”. Also select a font, font size, and alignment style (the default “Center” usually is best). To make the label stand out use a font size of 12 and make it BOLD.
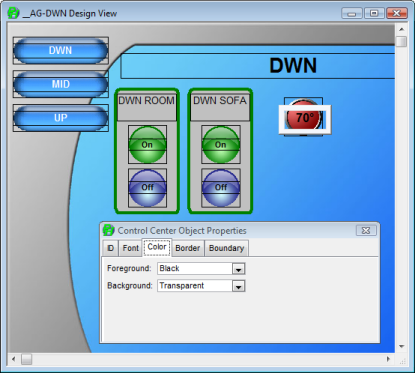
Next using the Color Tab of the Properties window, select a font color. You have control over both the font color itself as well as the background color of the label box. You can select a box color if you want, as well as a border around the box (the “Border” Tab). To reduce clutter I choose “Transparent” for the Background so the only the label itself appears on the CC Panel. Since this is a Temperature Up button, and heat is usually symbolized by red, you could select a Foreground color of “red” for the label.
As you make all these changes, the CC Design View window will reflect them instantly. Your CC Panel should now look like this.
Since this is just a Label, there are no Action or Image fields to be controlled.
Other Heating buttons can be added, as well as cooling. For simplicity I personally chose to just have a few buttons to set the heat and cool points to my normal choices of 55 (away) and 70 (home) heat, and 75 and Off for Cooling when home or away. I then added incremental up/down temp buttons that move the STAT Set Point temp in one degree increments (TEMP-UP and TEMP-DWN macros). The CC Panel STAT area configuration looks like the image section below. NOTE that when I bump the temp up/down with the incremental buttons, the “<SET” value will change accordingly to reflect the new STAT Set Point temperature, since it is actually a GlobalVar CC Object that reflects the real-time value of (in this case) the Global variable {TEMPSET} in my PH Global database. (see comments about these controls further below).
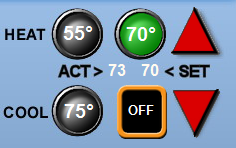
Using the PH “ph_setccobjgraphic” functions within the Macros called by these various buttons (see for example the TSTAT-Heat70 macro posted in the “Comprehensive Insteon Thermostat Macros” in this Repository Forum) the button images can be individually changed to make them red (heating active), blue (cooling active) or gray (thermostat turned off).
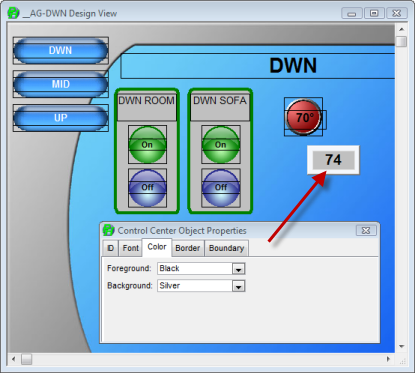
In the image above, another feature of PH’s extraordinary capabilities is also used. While the “ACT>” and “<SET” strings are fixed (static) labels (actually in my case they are a part of the CC background graphic image itself which I custom created to fir my needs) the “73” and “70” items are the values of Global Variables ({TEMPNOW} and {TEMPSET}) which are written by the my various STAT Macros which read the STAT periodically.
Documenting an approach to show the actual temperature value, for example, we have the following.
Create a NEW CC Object.
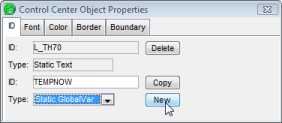
Give it an ID of “TEMPNOW” (it could be any name but I used a name that was the same as the macro this button calls to help remind me they were linked together) and a Type of “Static GlobalVar”
In its Property window, select the (previously defined) TEMPNOW macro.
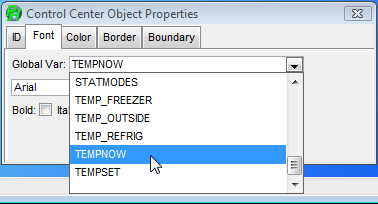
Give it a BOLD font of about 14 points and set its Color(s) and Frame box as desired. This Object will now “track” the value of the Global Variable called “TEMPNOW”
Do the same for the Set point or humidity values from your STAT and the CC Panel will them display the values of those Global Variables.
******************************************************
This has been a general overview of setting up a custom Control Panel for the Thermostat (STAT). Adding other buttons is just a duplicate of the above processes.
NOTE that once you get a button/label designed you can then COPY it with a new ID string. This makes duplication much easier. For instance to create a 55 degree temp set button, just select the 70 degree button (be sure to select the button object and not the text label on top of it), enter an ID for the new Button and click on “Copy.”
This will create a duplicate of the selected button. NOTE that the duplicate is placed exactly on top of the original button, so you can’t tell its really there unless you drag if off. {Note to Dave- You might want to consider offsetting duplicates a bit.}
Now you can use the Properties window to change the Actions, graphics, etc of the duplicate (for instance to call the TEMP-COOL55 macro).
******************************************************
******************************************************
A final note. There are many “Type” options associated with the ID tab of the Properties window. It is a bit daunting to figure out what Type to pick.
This is my best (unofficial) effort to explain what the differences between these various Types are. My pardons if I missed the boat on any of these. Please (anyone) jump in and correct as needed!
TYPE USE
Text Button - Allows you to directly fire off Macros/Insteon/X10/raw formulas, etc
Action Text - Same as above but can have a border box
Static Text - Does nothing but look nice. Usually a Label
Graphic Button - Allows you to directly fire off Macros/Insteon/X10/raw formulas, etc and has an up/down graphic image associated to reflect the state of the momentary press button.
Action Graphic - As above but with a border box
Static Graphic - Like Action Graphic (border box but no Action control). Can just be a static graphic, but often used in conjunction with the PH “ph_setccobjgraphic” function to reflect the state changes of an object controlled by a macro, by means of changed images.
Group Box - Draws a rectangle with color controls that can have a label and border
Rectangle - As above but without label or border
Round Rectangle - As above but with rounded corners
GlobalVar Button - This Type displays the Value of the selected Global Var (identified on the Font Tab of the Object Property) as well as fires off Macros/Insteon/X10/raw formulas, etc upon being clicked on.
Action GlobalVar - As above but with the addition of a border option.
Static GlobalVar - As above but without any Action triggering capability. Usually used to display the state of a Global Var
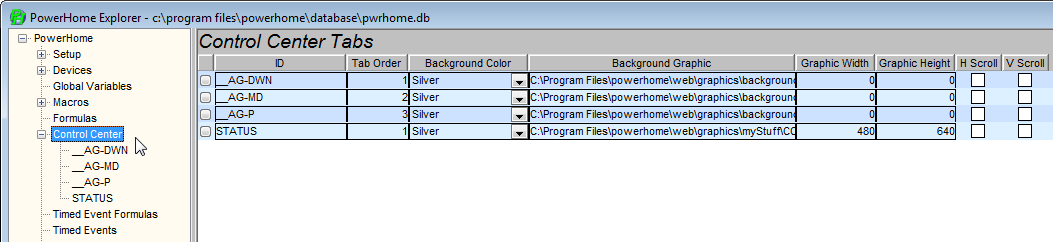
Hopefully this document will help to get you started in constructing your own customized Control Center Panel and enjoying another one of the "priceless" features of PowerHome. Shortly I will also post some guidelines to editing CC Properties in the CC database table found in the PH Explorer>CC Tab. The CC Panel we just defined has a root structure like this. Clicking on one of the Location tabs opens a detail window that reveals all of the properties associated with that CC Tab window. It is daunting (to say the least) to create such a db table from scratch, but starting with the Wizard and then editing a table is reasonably straight forward.
*******************************************
*** Here is a ZIP file of the Triangle shapes
*** I created for the Up/Down temp increment
*** control buttons... 2009-05-30_154811_tempbuts.zip
*******************************************
enjoy 
Edited by GadgetGuy - June 01 2009 at 13:30
__________________
Ken B - Live every day like it's your last. Eventually, you'll get it right!
|

 Active Topics
  Memberlist
  Search
  Topic: CC Panel Creation Tutorial


