dhoward
Admin Group


Joined: June 29 2001
Location: United States
Online Status: Offline
Posts: 4447
|
| Posted: September 15 2007 at 23:09 | IP Logged
|

|
|
With the latest beta of PowerHome (1.03.4.12), it is now possible to create some fairly nice lighting sliders. They don't really "slide" per se, but allow you to press anywhere along the slider length to instantly set the light to a particular level. The sliders that Im illustrating below are vertical sliders (you can copy the macros below and make minor modifications to create horizontal counterparts). The 100% position is at the top of the slider range, the 0% position is at the bottom of the slider range. You can modify the macros to reverse this behaviour if desired.
Each graphical CC slider *ONLY* requires a minimum of two CC objects. A borderless action text object that represents the slide range and a static graphic object to represent the actual slider. In my examples below, Ive included a 3rd object, a rectange object as a visual indication of the slider range.
The four macros have been written as generically as possible so that the slider operation can be nearly completely defined just by the graphical aspects of the CC objects. They've been written in such a way to handle both Insteon and X10 but the X10 side of things is not complete and will need some minor finishing work.
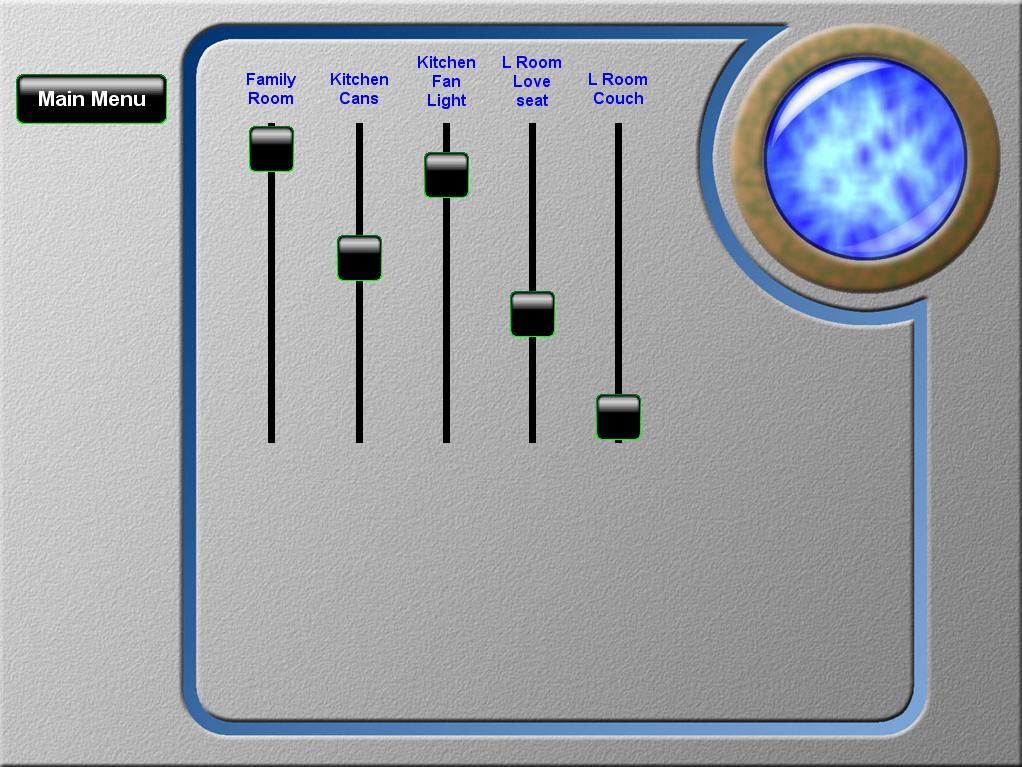
Below is a screenshot of my actual lighting slider page:
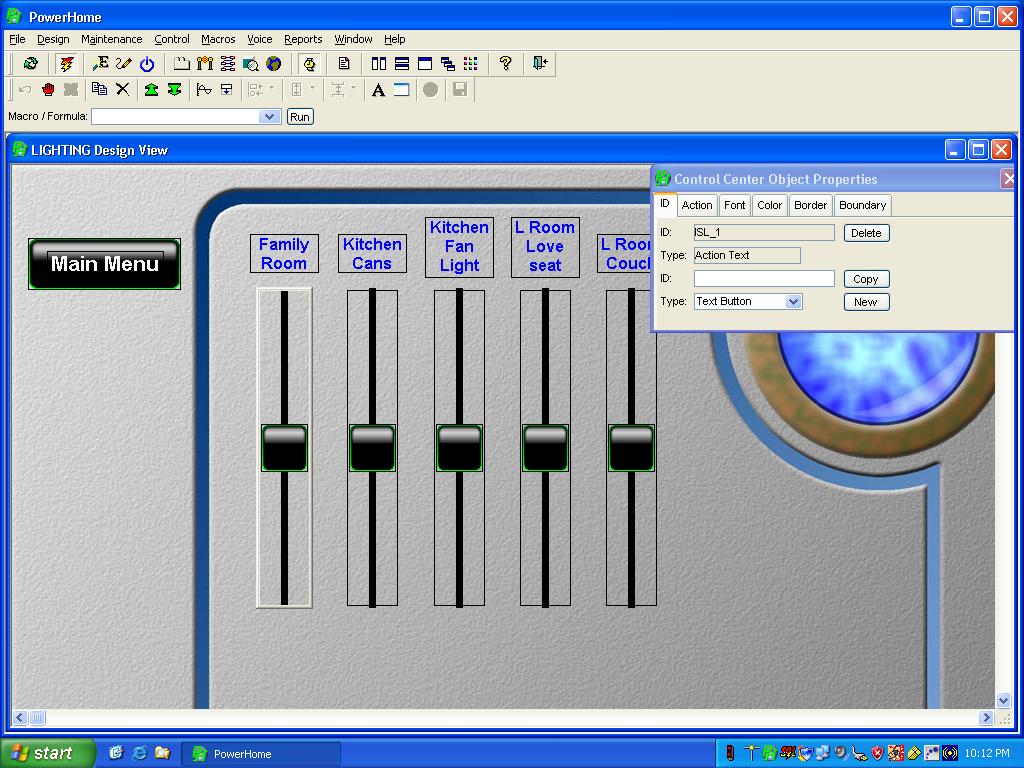
Below is a screenshot of my lighting page in design mode showing the individual slider objects:
Below are the 4 macros to make this work:
2007-09-15_223203_slider_y_setpointer.txt
2007-09-15_223223_slider_y_reinit.txt
2007-09-15_223247_slider_y_trigger.txt
2007-09-15_223303_slider_y_cc.txt
How does this all work?
The Tab ID for my CC lighting sliders is "LIGHTING" and will be reflected in a couple of the macros and will need to be changed to match your CC tab id.
A lot of what is going on is dependent upon the actual names (ID's) of objects to simplify some coding. When creating my CC objects, I used very specific names. The first thing I did (after creating the lighting CC tab) was to create the rectangle representing the visual slider range. I named this object RISL_1 for my leftmost slider which is the Family Room. The R is for rectangle, the I is for an Insteon device, the SL is for slider and the _1 represents the first slider control. I next created an action text object representing the actual clickable slider range. This has no border, a transparent background, no text, and fires the "SLIDER_Y_CC" macro. I sized this action text object a little smaller than the rectangle object so that I could see a little bit of the rectangle at the extreme ranges of the control. I named this object ISL_1. Last, I created a static graphic object to represent the slider control, using one of the stock PowerHome graphic buttons. I centered this vertically and horizontally on the action text control. I named this object GISL_1. Thats all you need for a single lighting slider. If you want to make another one, it's very simple. Just use the rectangular marquee selection tool (click on a blank area of the CC design tab to the upper left of the controls and drag down to the bottom right of the controls, drawing a selection rectangle enclosing the 3 new objects). Click on the "Copy" button in the toolbar and the 3 selected objects will be cloned (the clones are on top of the parents). Move the mouse cursor to the left of the selected controls and right-click. The 3 cloned controls will be placed at the location you right clicked. Use the arrow keys to fine tune the location or right-click again if necessary. Because of the naming convention we used (the _1), the clones will now have the names ISL_2, RISL_2, and GISL_2. Using this technique, you can quickly create as many lighting sliders as you need.
You'll also need to create a couple of triggers. You'll need a trigger for "System Process" on "CC Refresh". This trigger will call the macro "SLIDER_Y_REINIT". The second trigger is an "Insteon Device Chg" trigger on "[ALL]", 1, "[ANY]", with a boolen of: [LOCAL9] <> [LOCAL10]. This trigger will fire the "SLIDER_Y_TRIGGER" macro.
The way this works:
When PowerHome is launched, it will fire the CC Refresh trigger. This trigger calls the "SLIDER_Y_REINIT" macro. You'll need to modify this macro and adjust the code for the sliders you have (and their names) and what actual devices they relate to. Line 10 sets the tab ID of my CC lighting slider (LIGHTING). Line 40 sets the default names I used the action text area of my slider. You may need to adjust this if you used different names. Line 50 is the case statement that equates a slider CC object name with an actual lighting control. You'll need to change this to match your CC object names and your lighting ID's. If you're using X10 rather than Insteon, you'll need to modify line 80 to get back the X10 level as a value from 0 to 100.
The SLIDER_Y_REINIT macro loops through all of the sliders on the LIGHTING CC tab and updates the slider graphic position based upon the current level of the light. This macro calls the SLIDER_Y_SETPOSITION macro which expects the lighting tab in [TEMP1], the lighting action text object in [TEMP2], the max range of a lighting value in [TEMP5] (100 for X10, 255 for Insteon), and the actual level in [TEMP10]. This macro then calculates the proper position for the graphic button and adjusts it accordingly.
Whenever a light changes (the Insteon Device Chg trigger...you'll need to create other triggers if you're using X10), the Insteon Device Chg trigger will fire whenever the actual light level changes ([LOCAL9] <> [LOCAL10]) and call the SLIDER_Y_TRIGGER macro. The SLIDER_Y_TRIGGER macro mainly just sets the TEMP variables properly so that a call can be made to the SLIDER_Y_SETPOSITION macro which set the actual position of the slider to match the lighting level. You'll need to modify line 20 and set the case statement to map the slider object name to the lighting ID.
The next piece of the puzzle is the SLIDER_Y_CC macro. This macro is called whenever the invisible action text area is pressed. The magic of this is possible because of the latest changes in the .12 beta. Whenever the action text area is pressed (anywhere in the action text area, the entire action text area is a hotspot), the action of the object will get the tab id of CC tab in [TEMP1], the id of the action text in [TEMP2], the actual X location that was touched in [TEMP3], and the actual Y location of the touch in [TEMP4]. The purpose of the SLIDER_Y_CC macro is to take the Y location and the other characteristics of the slider controls (height, location, etc.) and convert this into a level. It also maps the ID of the slider control to a particular lighting ID and then sends the appropriate commands to set the light to the proper value. The SLIDER_Y_CC macro DOES NOT actually move the slider graphic. After the SLIDER_Y_CC macro sets the actual light level, the Insteon Device Chg trigger will be fired with the level change. THIS is what will ultimately update the CC slider control graphic so that it appears that the graphic jumps to the location that was pressed.
Hope this proves useful.
Dave.
|

 Active Topics
  Memberlist
  Search
  Topic: New CC lighting sliders


